Three Ways Contractors Dupe Homeowners

 1. Contractors promise a low price and then ask for more money.

You had several contractors show up at your house to bid a project. The prices are all over the map.  Who do you choose?  If it’s all the same work, why not go with the lowest price…right?

 If you sort by price only, you might be setting yourself up for a surprise.  Sometimes contractors are afraid to be outbid that they put a low number out first just to get the job.  Afraid to let this contractor slip through your fingers, you say yes and agree to the work. 

Time to break ground!  It’s an exciting time to imagine the improved space that will be waiting on the other side of construction.  Your contractor knocks on the door while his guys are digging in the background.  He says he needs more money.  You’re reluctant, but are afraid of what happens if you don’t cooperate.  No one wants to look at the torn up yard if the contractor walks off the job and you feel like you’re in too deep to turn back. 

Recently I had a homeowner share a similar story about his patio.  Several years ago he was quoted a price of $13,000 to complete the project.  After construction was underway, the contractor asked him for $5,000 more for the project.  The homeowner stood his ground, but the contractor disappeared for the rest of the project, leaving his workers on their own. 

2. contractors cut corners.

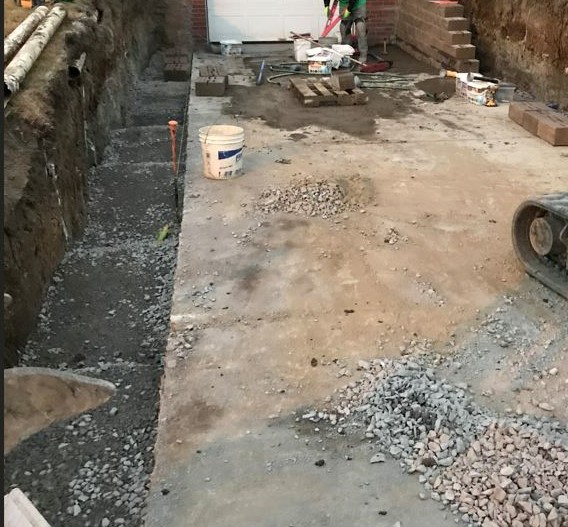
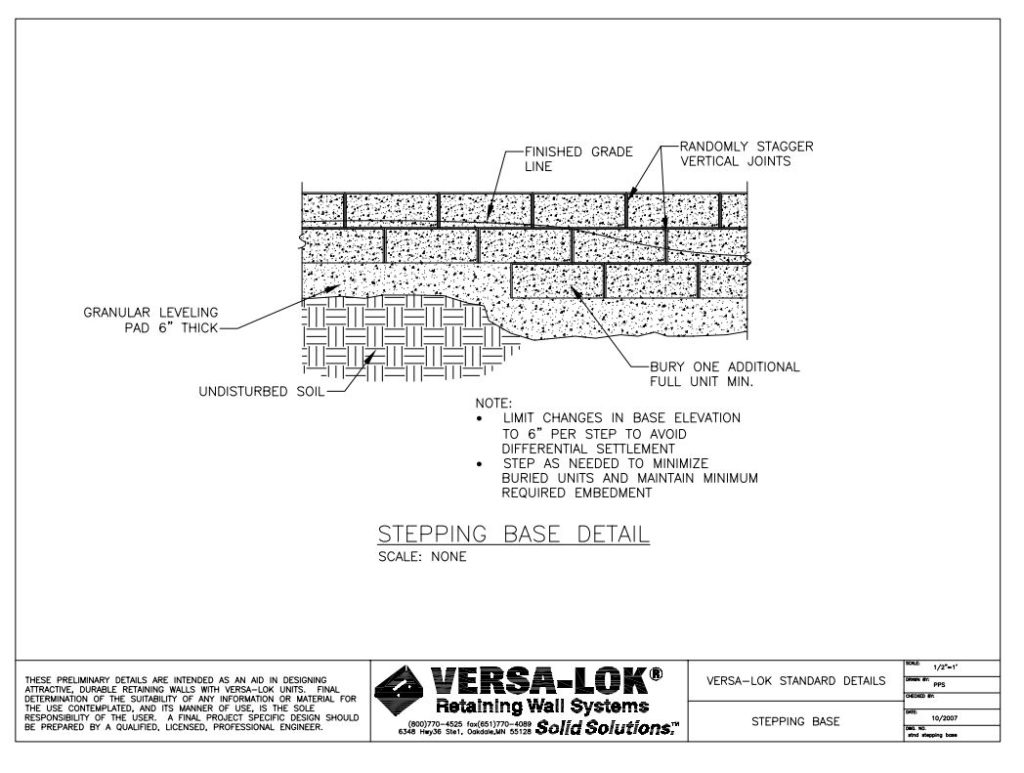
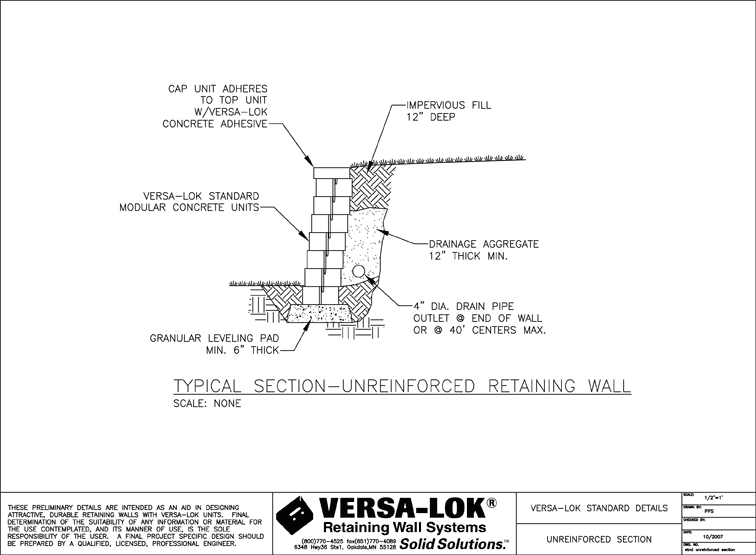
Again, you’re collecting estimates for a project.  Let’s say it’s a retaining wall.  You have prices ranging from $5,000 to $15,000.  How can this be possible if they’ve all said they’re going to use the same block and build the same size wall? In terms of the project itself, is the contractor going to use 6 inches of base?  Is he going to dig down 12” so he can put in 6” of base and 6” for a full buried block?  Will he dig back 30″ to account for block, backfill and batter?  Will he cut the block to keep the bond-on-half-bond stacking of the block?  He might tell you he will do all of these things and you place your trust in his word.  Maybe he even has it in writing.  Will he follow through?

Last summer we had a homeowner come to us in tears because her contractor promised her that he would complete her retaining wall with certain specifications.  He had it all in writing.  It was only when we tore down her newly built wall that we discovered that he didn’t keep his word.  In some places there was very little base.  In others there was none at all. 

3. Contractors bail on the job. 

Each year we receive at least one call with the same story:  a homeowner has a partially started project with some materials on site and installed, but the contractor disappeared, and they’ve been left high and dry.  It’s heartbreaking to hear.  No one enters into an agreement with a contractor thinking the worst, but it happens so often.  Some take to the internet to warn others but sometimes it’s too late. 

Aside from the stress that it causes, now it’s a more daunting task to find another contractor to take over.  For us, we won’t build upon another contractor’s work because there’s too much of a risk.  We don’t know how the first contractor prepared the base, so we’re not comfortable staking our reputation on something that might not be up to spec. Not to mention the financial burden, especially if a large sum has already been paid out to the original contractor.  It’s not always advantageous to fight because the legal proceedings might cost more than the money stolen. 

Just do a quick search on contractors bailing on the job and you’ll find many articles from construction pros, law firms and the news: https://www.google.com/search?q=contractor+leaves+job+unfinished&oq=contractor+leaves+job&gs_lcrp=EgZjaHJvbWUqDQgAEAAYkQIYgAQYigUyDQgAEAAYkQIYgAQYigUyBggBEEUYOTIICAIQABgWGB4yCwgDEAAYFhgeGIsDMgsIBBAAGBYYHhiLAzIQCAUQABiGAxiLAxiABBiKBTIQCAYQABiGAxiLAxiABBiKBTIQCAcQABiGAxiLAxiABBiKBTIQCAgQABiGAxiLAxiABBiKBTINCAkQABiLAxiABBiiBNIBCDI4NTFqMWo0qAIAsAIB&sourceid=chrome&ie=UTF-8#ip=1

Patio Planning: Part Three

Add On Features

Just adding the patio itself is a great way to expand your living space into the great outdoors! Setting up a nice dining set or a conversation set will give you a place to relax and enjoy your surroundings. If you want to kick it up a notch, the following features could enhance your experience.

______________________________

Seat Walls

Curved or straight, a seat wall made of retaining wall block and complimentary caps can be a great addition, especially around a fire pit. No chairs to cover and no cushions to keep dry!

Pillars

Pillars can go hand in hand with seat walls, usually flanking the ends of the wall as a nice finishing touch. They can work as a table to hold your drink or a place to house additional lighting.

fire features

Fireplaces and firepits can bring a cozy atmosphere to your patio. They can take your patio from a place to enjoy in the summer to a three- or four-season retreat. The crackling of wood burning can enhance the ambiance, but a gas option can really give off some serious heat.

lighting

Pillar lights and under cap lighting can help you remain outdoors well into the evening hours. Lighting options are also great for added security, illuminating what might otherwise be a dark backyard.

pergolas and pavillions

A pergola can bring that room-like feeling without completely shutting out the sun. Or if you want a way to enjoy your patio rain or shine, a pavilion might be a better option. For larger patios, a pergola or pavilion can help to divide the space into different zones. For smaller patios, the entire surface can be sheltered for a cohesive, well-defined space.

Outdoor kitchen

Cooking outside gives you the benefit of using a grill or smoker for healthier food options while keeping the food smells out of the house. Enjoy many of the same amenities as your indoor kitchen while taking in the fresh air. Whether it’s your next family meal or a gathering of friends, feel like you’re treating yourself to a special meal without ever leaving home.

Do these features have to be installed with the patio?

Depending on the layout of the patio and the property it makes more sense to include some of these features at the same time as the patio. Even if access is not a challenge, many times there is a cost savings to add the feature during patio construction rather than later on. Otherwise, these additional features can be added on in the future.

Patio Planning: Part Two

Choosing Materials For Your Patio

Now it’s time to pick out pavers! A quick look at a manufacturer’s website or flip through a catalog might make your head spin because of the available options. Let’s narrow it down to keep the process fun and eliminate overwhelm.


Basic Paver shapes

From what I have seen, there are three main categories that we can use to describe available pavers styles:

Rectangular – Starting with the most basic Holland style 4″x 8″ paver up to elongated plank styles, this will give you a uniform look for the patio

3 Piece Set – This is usually a combination of a small rectangle, a large rectangle and a square. This will give you a more random look for the pavers.

Unique Offerings – Occasionally you’ll find shapes like hexagons, diamonds and triangles if you are looking for something a little out of the ordinary.

Paver styles

Maybe you’re not looking for a certain shape of paver, but you have a certain style in mind. There are plenty of options for the following aesthetics:

Weathered/Old World Look – Some pavers are tumbled to have that aged appearance while others have been cast from molds to replicate older materials.

Standard/Traditional – Usually these have a mild surface texture and a blend of colors on the surface. These are generally the most common and universal fit.

Modern – These offer crisp lines, usually smooth textures and flat or single color surfaces. Some pavers even offer unique brushed or more raw-looking surfaces (think industrial).

How Does Paver Style Affect Price?

Compared to the size and shape of a patio, paver style has less affect on price. There is a wide range of price points depending on the style, however it’s important to know that the pavers themselves are only 20% of the cost of a project. The excavation and base preparation accounts for 80% of the project cost. The process for installation remains the same across different paver styles. Generally speaking, the standard/traditional styles of pavers are the most economical while the more modern and weathered/old world styles of pavers are mid to higher range in price.

Patio Planning: Part One

Choosing Your Patio’s Size and Shape

When it comes to patios, there are a number of choices to make. The following information walks you through the planning process to ensure the best fit for you!


The function of the patio

Will this be a space where you can relax alone or maybe with a few people?

Would you like to sit down to dinner on the patio after cooking on the grill?

Are you excited to host larger gatherings of family and friends?

It’s possible that you may want your patio to serve multiple functions. Distinct areas can be defined to serve each function. For example, the main portion of the patio might be large enough to hold a table and chairs for dining and a separate fire pit area can hold casual conversation after dinner.

Before committing to a size, it’s a great idea to check measurements on the furniture you’ll be using. Give yourself and your guests plenty of room to move through the space without feeling cramped.

How Shape and Size Can Affect the Price

For the most bang for your buck, right angles are an economical choice. With squares and rectangles a smaller patio can have more useable space over a rounded patio. There is less material waste and typically less labor cost as well.

When planning for a curvy or rounded patio space, account for more wasted pavers for unique cuts. The labor costs increase as well. Saw blades are straight and large so as to cut all the way through the pavers, so multiple passes with a saw need to be made. There may even be the need to grind some pavers to achieve a smoother look.

Location of the patio in relation to fixed structures can also affect pricing. If a patio is situated between the back of a house and a retaining wall for example, measurements need to be more exact to fit the space. Sometimes this can be offset by adding a border of pavers between the main ‘floor’ and the vertical structure. Working around deck posts will also add more time for cuts.

Other ways paver selection can affect price include the use of inlays or mixing different paver styles and thicknesses. In the same way patio installation between fixed structures can add labor costs and more material waste, inlays will increase the price as well. Also let’s say the main part of the patio has thicker pavers than the border, there will be more time involved to prepare the bedding of the patio to accept those different heights.

As the saying goes…

 “A jack of all trades is a master of none, but oftentimes better than a master of one.” 

It wasn’t until recently that I learned that there was more to the saying than the first part that we all know. I’ve read that this is the original full saying. I’ve also read that pieces have been added along the way.

Let’s take a look at this for a minute. It can be handy to have a general knowledge of a variety of topics. That’s how our school system works and helps to make us well-rounded. I think it’s a great idea to keep learning about a variety of subjects.

Is it really better though to have a small understanding of a large number of topics or to be highly specialized in one trade?

We don’t think twice about doctors. Every part of our body has a specialist. There are even sub specialties. Lawyers study a specific area of the law. Teachers each have their own specialty subject.

To bring it back to the trades, we have a good understanding of the specialization of electrical, plumbing, brick masonry, and floor coverings. Even plaster, painting and drywall are specialized. For some reason, this hasn’t caught on with much of exterior work.

It’s tempting to have one crew take care of it all-cleaning the gutters, mowing the lawn, trimming the trees, or building a retaining wall or a patio. The convenience factor is high. Just ask yourself if it’s really the best decision in the long run. Can we really have a deep understanding of one trade if we’re busy learning them all?

Retaining Wall Step Ups

We know that in Southwestern Pennsylvania flat land is more the exception than the rule. Especially along a sloped driveway, stepped retaining walls are fairly common. Here is the right and wrong way to approach a stepped wall.

Unless the terrain is only a few inches away from level, it’s necessary to cut benches into the slope. In other words, the trench for the base will look like a set of steps.

The photo below gives a sense of how the step ups should look.

Base material prepared on a stepped terrain.

This Versa-Lok illustration shows where the base material is prepared at two different levels. Since the base is usually confined to a trench (and hard to see), this shows a better overview of the system.

Maybe you’ve seen a retaining wall that has block laid to follow the contour of the slope. That’s a huge no-no! The tendency for that wall mass is to shift down the slope.

A sloped trench is also a bad idea. When the trench is sloped, even if the base is built up and the block are level, there is still a tendency for the wall mass to shift down the slope.

Check out how much block should really be buried during a step up. When the terrain changes, you’ll actually see a full two block that are buried. This is protection from the wall being undermined over time. If you’ve ever seen the base of a wall at ground level, the material will eventually wash out and leave block to sag.

The bottom line is this: not all stepped walls are created equal! Where corners are cut and prices are slashed, there is good reason to be concerned. What looks okay in the moment might become a problem down the road.

The Scary Truth About Landscape Contractors

Most trades have a certain level of training and an official way to recognize proficiency. In landscaping/hardscaping, nothing is required. There is no schooling necessary. There are no required apprenticeships. No certificates are needed to demonstrate knowledge or skill.

Isn’t Education Available?

What about programs at schools like Penn State? They are available to those who seek them. I’ve browsed their course listings and found that a student will graduate with a better understanding of plants, insects, soils, and how to run a business. They lack a foundational education in hardscape installation.

To become a hardscape installation specialist, all one needs is the desire to build walls or lay pavers. That’s it. To install professionally, they first need proof of insurance. Then they register with the state attorney general’s office as a home improvement contractor.

How Does A Landscaper/Hardscaper Learn Their Trade?

There are a few avenues to take to learn the proper techniques.

  • Trade Associations

The National Concrete Masonry Association (NCMA) and the Interlocking Concrete Pavement Institute (ICPI) hold in-person and online courses for certification. These also require a certain amount of hands-on experience and continuing education.

https://ncma.org/

https://icpi.org/

  • Materials manufacturers

Locally we have the R.I. Lampus Company who not only host the NCMA and ICPI courses, but they have a training facility for hands-on experience.

https://www.lampus.com/

  • Working for another landscaper/hardscaper

How much more do we learn when the work is hands on? It’s like a paid apprenticeship. Of course this should be a reputable company and hopefully NCMA/ICPI certified.

  • Online tutorials and courses

YouTube might not be the best place for a landscape/hardscape education. The videos I’ve seen when I search for ‘retaining wall construction’ have been DIY guys offering poor guidance. The material manufacturers have put together some great resources to follow.

Unilock: https://unilock.com/learn-plan/

R. I. Lampus: https://www.lampus.com/resources

Techo-Bloc: https://www.techo-bloc.com/

What Does This Mean For My Project?

Without a standardized training program for landscapers/hardscapers, you as the homeowner must vet contractors more carefully. I recommend familiarizing yourself with standard construction practices. Also, I would ask contractors some questions about their work and training to gain insight on their level of expertise. Lastly, check with past customers and ask to see work that was completed a few years ago. This can speak volumes about a contractor.

What should a retaining wall cost?

I have read plenty of articles from Forbes to DIY blogs that have an answer to this question. Even sites like Angi will provide pricing information. Is it truly accurate?

In my experience, not really. I think it sets pricing expectations without considering the exact conditions you might be facing at your home.

size of the wall

Square footage is generally how a wall is measured. We have to include at least one course of block that is buried for the footer. Was this considered by the writer of the article?

If a wall is at all over 4 foot in height, this automatically adds to the cost in terms of reinforcement for wall stability. This means more excavation into the slope, more aggregates needed behind the wall, and the use of geo grid to anchor the wall into the slope.

Materials used

The type of block that you might find at the big box stores isn’t suitable for a retaining wall. It is okay for a DIY a flower bed border. For a wall that will hold back a load of any kind, professional materials from a landscape supply yard are necessary.

Block that deviate from the typical standard Versa-Lok will generally cost a little more due to enhanced detail (more stylized or made to mimic the look of natural stone). These higher-cost block options usually don’t hold back as much as the typical Versa-Lok, so the reinforcement that I mentioned above would be necessary to create any wall taller than a standard 2′ garden wall.

Footer to Upper Courses Ratio

The preparation of the footer for the wall is more time consuming than setting the block for the upper courses. It’s the foundation that can make or break the rest of the installation. For a wall that is 100 feet long and 2 feet tall, the actually laying of block will take longer than a wall that is 50 feet long and 4 feet tall.

Access to the site

A retaining wall sitting along a driveway or across the front of a property makes for a quicker install than a project inside of a fenced in backyard. Not only is there more time in traveling back and forth to the backyard, but access is limited to within the fence gate or between fence posts if a panel can be temporarily moved. Without machine access, more labor is needed.

conclusion

There are a variety of factors that affect the cost of a retaining wall. Pricing isn’t a secret, however it can’t be reduced to a simple square foot number. I believe that the intention to help homeowners prepare for a project is great. What I don’t like is the disappointment that comes with unmet pricing expectations.

Retaining Wall Lingo

Quick vocabulary lesson on the key components of a retaining wall

Here are some of the key terms to use when speaking about a retaining wall:

Segmental Retaining Wall (SRW): This refers to any wall that consists of individual blocks rather than a wall that is a single structure (such as poured concrete).

Base: The foundation of the wall. Usually made up of well compacted 2A limestone. 6″ deep minimum

Base course: The first layer of block and the most time consuming to lay because it needs to be completely level. This block should be completely buried/underground.

Batter: The stepping back of a retaining wall into a slope. When looking at the wall from the side, the wall should not be completely vertical/stand straight up and down. The amount of batter depends on the block style, but this is usually around 1/2″ to 3/4″ for each course of block.

Drainage aggregate: The stone that sits behind a wall. Typically this is #57 or 2B angular limestone. (Rounded stone will not stay put). This should be at least 12″ deep from the back of the wall block into the slope.

Drainage pipe: Not a French drain, but rather a pipe that sits behind the wall (usually behind the second course of block so that it can outlet at or above ground level). This is a 4″ diameter pipe that can be either corrugated, perforated pipe or firm pipe/PVC with holes in it.

Impervious fill: This is what sits on top of the backfill when the wall is all done. It can be soil, mulch, stone or a combination of these materials. Along with the caps, this can finish off the wall and restore the lawn or landscaping post-construction.

My go-to visual for retaining wall construction is this cross-section from Versa-Lok:

The 411 on terraced retaining walls

I just dated myself with that title. Yes, I know it’s also pretty lame.

Usually perceived as a way to skirt regulations or cut costs, homeowners and contractors alike will turn to terracing as the solution for holding back large or steep slopes.

The Law of the Land

Let’s start with regulations. Any wall over 4 feet in height needs a stamped engineered drawing and a permit. I can’t speak for other states, but this holds true in Pennsylvania. I’ve seen walls that are 3-ish feet tall and immediately behind that wall will sit another wall about 2-ish feet tall. Math is math though. We still have 5 feet total height of heavy concrete block holding back the slope. Beyond violating building code, this is a dangerous situation. The bottom wall has to hold up the slope AND the weight of the upper wall. Something has to (and will) give.

In the above example, I’m assuming that neither of these walls was reinforced with geogrid (another topic for another blog post). Reinforcement is the only way that a terraced situation like that will stand the test of time. ‘Like that’ meaning the two walls are close together.

There is one other way to create terraced walls without reinforcement. You just have to have the space to make it happen. A good rule of thumb for spacing terraced walls sans geogrid reinforcement is this: take the height of the lower wall, multiply it by 2 and that is the number of feet that you must have between the upper wall and lower wall. This ensures that the upper wall is not adding extra force to the wall below. In the above example, if the bottom wall is 3 feet tall, then you would need to excavate back at least 6 feet into the slope before starting the upper wall.

Let’s Talk Dollars

On to the cost of terracing. Whether you reinforce both walls or use the handy rule of thumb from above, terracing generally costs more than creating a single taller wall. Even with good distance between the walls, there is a lot of dirt to be excavated. It also adds more linear feet of base course. The most time consuming portion of the wall is prepping base material and leveling the first course of block. Terracing takes double the time.

It’s Not All Negative

Terracing is a great way to add some visual interest to a slope. The space between the walls allows for some plantings to soften the landscape. It can also be a great way to open up a space that otherwise might feel closed off (think tall wall in a confined space). I don’t want you to think that I’m against terracing. I just want you to be in the know about the right way to do it!